Learn with me

Some hints and tips to help you start

Advice and Tips


Patience is always anice skill to acquire. This is especially true with anything involving a natural process. At best you can optimise the environment but you need to trust Mother Nature and give her time to do what she does best.

Feed your worms, optimize their environment (temperatute, pH, moisture... ) but don't disturb them until the next feed and don't 
try to make them work faster. The more you rush a natural process the worst it might get.

Refuse, Reduce, Reuse, Repurpose and Recycle

With vermicomposting we are already reducing our waste to landfill by recycling it with the help of bacterias and earthworms.

We can further refuse buying any new item unless necessary and reuse or repurpose something else. You can reuse a wooden storage crate, a plastic barrel or a styrofoam box as a worm farm or even repurpose an old fridge or bathtub.

What I often do is participate in a local Freecycle (free + recycle) online community and give and ask for items people don't use anymore. Thanks to this I now have 7 worm farms all for free including the worms (except the European Nightcrawler which I had to buy to breed for fishing) I also reused an old wooden crate. Again from the Freecycle community: a paper shredder, shredded cardboard and egg boxes.

  1. Overfeeding (too moist, too acid, smelling)
  2. Flushing bins with water & confusing leachate with compost tea
  3. Lack of aeration

Overfeeding: It is widely advertised that worms can eat half their weight in food every day, some websites even say up to twice their weight in food daily. Although this might be true for some species in the most ideal environment ideal optimum care this optimum state is difficult to reach let alone maintain. In practice Red Wigglers (Eisenia Fetida) will eat about their weight in food per week. Overfeeding will endup with one or a combo or all of the following situations:

  • too much moisture due to the food breaking down and releasing their water content
  • the food will go sour and the bedding's pH will drop (acidity increased)
  • the bedding will go anaerobic
  • the bedding will heat up too much
  • the bedding will smell foul
  • worms will try to escape or die
  • other critters will invade and quickly reproduce in the bin: pot worms, springtails, fruit flies etc...

What to do: adding and mixing in a lot of bedding material (newspaper and cardboard shredded or hand teared) will help controlling the moisture and will also reduce the pH by diluting the acidity of the bedding. Additionally mix in a handful or two of garden lime which will act as a pH buffer. Garden lime can be replaced with wood ash or crushed eggshells.

If you have some old dry grass clippings or dry leaves, if they are in decomposing state (very dark looking, smell earthly) then mix them in as well. They will add extra composting bacterias.

Stop adding food until all existing food has gone, then start feeding in small amount and adding the same amount in bedding material as a base on which the food will be deposited. Then cover with more bedding material.

Flushing bins with water & confusing leachate with compost tea:ome worm farm manufacturers and websites recommend flushing bins on a weekly basis to create what they call worm tea/worm pee that leaks at the bottom of the bins. This liquid is NOT worm/compost tea it is called leachate. While under ideal conditions it is safe and good to use, it might also kill your plant. The leachate can stand in the bottom tray for a period of time and become anaerobic breeding bad bacterias and pathogens. It might contain casting nutrients but will also contain bits of unprocessed food and their liquid which can rot in the leachate.

Secondly, flushing bins with water creates other issues, especially in summer. When the water enter the bedding it will fill all the air gaps and prevent a good ventilation, water is also a heat conductor so it will bring the temperature of the bin up. Additionally it might make the bedding go anaerobic especially with plastic bins that are not breathable.

What to do:

  • stop watering your bins
  • use more absorbing bedding material: hand teared cardboard and newspaper are great
  • cover the bedding with more shredded newspaper and use a spray to keep the top moist
  • you can optionally use a moist burlap (hessian) bag to cover the bedding

Lack of aeration: beginners will usually buy plastic worm farms or make their own from plastic container. Plastic does not breath and retains moisture too well. Even with their ventilation drill holes air will not flow to the bedding surface well enough, gases accumulate, moisture does not evaporate and the bin might go anaerobic, smell bad and worms might try to escape.

What to do:

  • make bigger holes and cover with a fly screen
  • alternatively remove the lid, if worms try to escape at night (especially during their first week in the bin) you can shine a light down on the bin or put the lis back or cover with a hessian bag at night
  • mix the bedding material with more bulky material such as corrugated cardboard which will create air pocket and facilitate air flow

I learned the hard way that not only it stinks but if you get some on your hands it won't go away easily. Soap, lemon, alcohol, vinegar won't help. The only thing that seemed to help was:

  • baking soda but you need a lot and let it do its work on your skin for a moment
  • diluted bleach followed by a thorough wash with soap and lots of water

Other potential effective solution is lactobacillus serum which is used (amongst other) as an inoculant for a Bokashi compost to cut the smell and digest the food scrap.

If your worm bin start to smell foul, this means you have overfed your worms, check "The three most common beginners mistakes" tip.

This is an unusual tip for a worm farming page but sometime you might want to take photographs of your little babies and/or their composting friends: larvae, beetles, springtails etc... Either for your own personal record or to ask for help on groups and forums. A picture is worth thousands words, but only if the picture is good enough.

So we are not talking about state of the art kind of photography but rather taking a photograph that is clean, sharp and contains enough detail for the viewer to be able to recognize the subject in the photograph.

I will not cover the use of a DSLR camera but just one that we all always have with us: the mobile phone camera. Even if they are getting better and better they cannot rival the hardware and lenses found in DSLRs. So if any of you do photography please keep that in mind as the tips here are very basics.

Sharp vs blurry: 
What makes an image blurry?
There are multiple causes, for mobile phone cameras there is photographing a subject too close to the lens, low light conditions and camera shakes.

Low light conditions and camera shakes are similar. It's the camera movement recorded into the image from a shutter speed that is too slow compared to the movement of the subject or the handheld camera (shaky hands). What is a shutter? Remember in old days when a photographer holds a cover in front of the camera lens and takes it out for a moment and then put it back on? That's a manual shutter. It was very slow (few seconds) which is why the camera needed to be on a tripod and the subjects stay still. With digital cameras come electronic shutters. They are very fast but in a mobile phone camera the sensor is not very light sensitive so the camera app has to set a slow shutter speed in order to give sufficient time for the right amount of light to flow through the lens and get recorded by the camera's sensor. But the slower the shutter speed the more movement of the handheld camera will be recorded resulting in a blurry image.

So what can you do to get a sharper image other than upgrading the camera? The answer is provide more light into the subject and the surrounsing. Now that you read this, don't turn on the camera built-in flash. The light from that flash is coming from near the lens axis and will make every thing looks flat, shiny, lacking of contrast. If you have a desk light you can use that at a say 45 degrees angle to the camera to subject axis and a bit higher than the camera itself. This will cast some nice shadows that will give contrast and dimension to the end result.

Another way to get a sharper image is to do what photographers from the good old days did: use a tripod or something on which you can support the camera. I sometimes rest my mobile phone or hand holding it on the edge of the worm bin or I would even put a piece of cardboard on top of the bedding and rest the camera on it not only it is more stable (sharper) but it also gives a more interesting perspective (angle) and you also get closer to the subject which will give more details.

That leads me to details of the photograph.

Details is not clutter! It's nice to see all the casting and food around your worms but if for example you want help identifying the worm you have you need to provide details about the worm itself and exclude any non related elements. You cannot always remove the background in regular photography but with a worm farm you can remove a single worm and put it on a neutral surface (gray paper, cardboard). Or you can just get the camera physically closer to the worm. Don't be lazy and use the digital zoom because this is not always giving nice results. Move the camera closer, fill 75% of the screen with the worm.

Take a global shot and some close up shot too: the worm in its entirety, the head, just the tail.

But be careful. Some cameras won't be able to focus when the subject is too close to the lens. So do some test to see what is the closest distance you can get to any object before the image gets blurry then back off.

I mentioned contrast. The contrast is the size of brightness gap between the darkest area of an image and the brightest area. For example a groom in black suit next to a bride in white gown would give a high contrast image. Taking a counter light portrait (a face with the sun behind) is a very high contrast image. Our eye can handle quite high contrast which is why you can still see someone face even if the sun is behind them but the camera will either render the face black or the sky white. A camera cannot record all the levels of brightness in a high contrast scene, it has a low dynamic range.

So to avoid weird looking images, try to arrange the scene so that the brightness does not vary too much: stay away from direct sunlight unless it gives an even lighting. You can for example move an indoor worm farm to one foot away from the shadow to sunlight edge in the shadow side. Or wait for an overcast day and take the shots outdoors.

Update: 
What if you are as close as you can and the subject is till too small in the frame? Obviously we will sooner or later reach the limit of our equipment. So t he only way you can get that nice close up shot of a springtail is to buy specialised lens called macro lens. There are macro lenses that clips onto the mobile phone. But that will be the subject of another post. I need to buy one of those lenses first 

One of the trickiest things with worm farming is the weather. Just like us worms are affected by changes in the weather conditions be it the temperatures or atmospheric pressure. If you live in place where, depending on the seasons, temperature goes outside of the worms ideal temperatures, you might start to find worms trying to escape, dig down through the trays or even die in mass. Rainstorm also affects our wiggly friends, they don't like drops in atmospheric pressure and might want to climb up the walls of your bin, especially you have Blue Indian worms (Perionyx Excavatus) or African Nightcrawlers. Scientists are still unsure of the reasons why worms are surfacing from the ground when it rains, some says rain water fills gaps in the soil and restrict air flow and thus repel species of worms that requires a lot of oxygen, others say earth worms are taking the opportunity for moving further distances easier than underground. What ever reason that is, this can be quite a stressful experience for the worm keeper to see hundreds of worms under the lid or even worse, to see those hundreds on the floor drying out to death. Obviously, we can control a lot of things with a worm farm but weather is one thing you don't have control on, but following is a list of things you can do to help:

Temperature management

Earthworms need a cool environment, ideal temperatures for both Eisenia Fetida, Eisenia Hortensis and Perionyx Excavatus are in the range of 60°F to 70°F. So your first step in temperature management would be to find shady area to install you bin in. This could be under a pergola or a tree or even better if you can move the bin indoor. The less direct sun the better (except in winter as we will see).

This summer, we had temperatures of up to 104°F here in NSW, Australia, but being under a well shaded pergola covered with crawling plants, my worms were happy with minimal effort from me. Followings are things you can do to help lower the temperature of your worm bedding:

  • if you have stacking tray system, add one or two trays UNDER your feeding tray and fill them with moist (not wet) fresh bedding material. Heat goes up, so the bottom trays will be cooler giving the worms some more comfortable place to retreat to. Make sure that the bedding of each tray is in contact with the bottom of the tray above or the worms won’t be able to migrate through the trays. This has been very helpful to me, thank you Brian "The Worm Man" for this tip.
  • remove any worm blankets or excess dry bedding on the top worm content, they just keep the heat inside the bin, you want it to escape
  • DO NOT water your bin, water fills gaps and restrict airflow and, worse, it conducts heat into the core of the bedding. If the bedding dries out, use a sprayer to moisten the surface
  • remove the lid of your worm bin during the day to allow heat to escape and further gas exchange as food ferment quicker when it's hot
  • slow down on feeding or stop all together during hottest days. In the heat food will ferment quickly and will add even more heat and if you happen to overfeed during a hot week you will have some nice worm soup
  • just once, you can fluff the bedding to help with air flow, take the opportunity to add some fresh bedding material (shredded/torn corrugated cardboard, newspaper or egg cartons)
  • cover your bin with a large wet burlap (hessian/jute) bag, if possible put the two ends in a bucket full of water, and again if possible point a fan towards the bin. This will cool down the bin by evaporation of the water.
  • freeze water inside plastic bottles and put the bottles on top of the bedding, DO NOT put ice cubes directly in the bin as when they will melt down water will penetrate the bedding

Winter is another kind of issue, just as in high temperatures, worms will slow down during cold days and can also die if the temperature drops too much. I don’t have experience with caring for worms in freezing cold temperatures but the following tips will help you make through mild winter season (temperature above freezing):

  • add worm blankets or a thick layer of dry bedding material to trap heat
  • move your bin to a sunny area of the garden, but make sure to monitor the heat, even in winter direct sun can still generate a lot of heat
  • move the bin indoor in a room with heating
  • like in summer, if you have stacking tray system, add one or two trays UNDER your feeding tray and fill them with moist (not wet) fresh bedding material, and add more food in the feeding tray. This extra food will decompose and generates heat to warm up the worms. The extra trays are for safety measure as too much heat can still be generated. Make sure that the bedding of each tray is in contact with the bottom of the tray above or the worms won’t be able to migrate through the trays.
  • some homemade bins can be built with copper or PVC pipes that goes through the bedding and during winter you could pump hot/warm water through the pipes
  • put hot water inside plastic bottles and put them inside the leachate collection tray at the bottom

Rainstorms’ low atmospheric pressure

Unlike temperature, there is nothing you can do to alleviate its effect on the worms. If your worms are freaked out by that they will try to escape. That being said, I have yet to experiment mass exodus, the most I had was about twenty Red Wigglers or a couple of European Nightcrawler climbing walls or under the lids. What can you do?

  • provide more ventilation, removing the lids of my worm bins during the day actually helped me contain my worms even if it sounds counter intuitive. I put the lid back during the night to avoid rodents getting in. But you could just cut a large hole and cover it with fly screen. More oxygen makes the worm more comfortable so they might be less incline to crawl out due to survival instinct, not sure…
  • at night, shine a light on top of the bin, this might discourage them from getting out of the bin
  • a nice tip from George Mingin from Kookaburra Worm Farms is to mix a lot of saturate a small glass of water with salt, then use a cloth soaked in the mixture and paint a line around the inside of the bin. When the water will evaporate it will leave a circle of salt and no worms will ever try to cross that circle. Sounds like voodoo :-D

I hope this will help you out.

As discussed in the glossary under the "pH buffer" section, eggshells can be use as pH buffer to lower the acidity of the bedding in case of overfeeding or adding acidic food. However, a lot of people assume they can just add the eggshells as is or just slightly crush them would work fine. Another belief is that eggshells are preventing slugs from coming into the garden. Here are some online material that will help you make your mind.

Eggshells vs slugs

Garden Myths has busted this myth and in their experiment slugs have no problem crawling on to a ring of broken eggshells: http://www.allaboutslugs.com/eggshell-myth-busted/

Crushed vs finely ground eggshells

I have spent a bit of time looking for reliable documents and here are my findings. "They (eggshells) must be ground finely enough and mixed with the soil so that lime particles come into contact with acidity on the surface of soil clay and organic matter "

Eggshells as grit for the worms

In order for the eggshells to act as grit to help the worms process the food, the eggshells definitely need to be ground or else the worms won't be able to ingest them.

If you have a house, there is an extremely high chance that you also have a lawn which requires regular mowing especially in the nice seasons. Some people love to have wonderful lawn and would give a lot of care to it. I'm not too much worried about my lawn, as long as I'm not killing it, if it is not the greenest it's fine. I have a lawn mower that has a bag but also has the option to mulch the clippings and push them down into the thatch so I can not see any clippings on the surface after mowing. This is great for returning the nutrient to the soil and feed the lawn itself.

From time to time I would keep a bagful or I would go collect the clippings from the neighbours who throw them away. What for? For the worms.

Now before we continue, please note that grass clippings are high in nitrogen and adding too much to a worm bin will heat up and kill the worms! Even old aged grass clippings can still heat up, so be very careful.

I don't feed grass clippings directly to the worms but I use it mixed with various material for these purpose:

  • when I start a new bin, I would mix in some aged grass clippings that have been sitting in a hessian (jute/burlap) bag in the open in a corner of the garden for few months. The aged clippings are full of beneficial bacteria (if you have stored them in a breathable container to allow oxygen to get in) and will help inoculating the initial bedding, this will help settling down worms that you would have transferred to this new bin. Bentley (“Compost Guy”) Christie calls this type of material "Living Material"
  • Living Materials are also excellent for optimising worm food. Although this is not necessary, optimising food scraps will help breaking them down faster by adding composting bacterias on the surface of the food scraps.
  • I also use fresh grass clippings to heat up a pile of horse manure. The use of animal manure comes with some risk as they contain seeds that can germinate in your garden and more importantly they also potentially contain some pathogens bad for the plants and for you. So hot composting horse manure is must in order to kill the seeds and the pathogens. With fresh horse manure it is not necessary to do anything else but pile it up in a good amount. When you use aged horse manure it is still necessary to hot compost it so to help heating it up you can add layers of nitrogen rich materials such as grass clippings or used coffee grounds.

A worm farm is a great way to compost your food scraps and some of your garden scraps too. So is it necessary to also have a regular compost pile or bin? Necessary no, but useful yes.

Most people would have one or maybe two worm farm like a Worm Cafe, a Can-O-Worm or any other commercial or DIY small size bin. However, one bin or even two or three bins are not enough to process all of the food scraps of a small family. So what do you do with the remaining scraps? This is where a regular compost bin or pile is useful (that is if you have space in your garden for one).

With a regular compost bin, you don't have to worry about the type of food scraps (still no meat or dairy products) you add to it. Although some will break down slower (woody materials) than others. I have several bins/piles:

  • one pile for horse manure that I will use for the worms and the garden
  • one pile for branches that will be taking ages to break down, I will invest in a garden shredder to help this
  • one commercial compost bin where I put all sort of things
  • one DIY compost bin made of a plastic barrel where I put leafy garden scraps.

The compost you get thru this regular composting process is, although not as amazing as vermicompost, is still very good for the garden. But you can also use it like the aged grass clippings, that is:

  • mix with the initial bedding material when starting a new worm bin to inoculate with beneficial bacteria
  • sprinkle on food scraps to help break it down faster
  • if not too old, you can also use it as worm food

The other great thing is having a compost pile or a bottomless bin will also attract wild worms in your garden around the bin/pile and this will help getting a great soil.

To most compost worms, animal manure is a great source of food and bedding material, the Red Wigglers are also known as manure worms. However for various reasons, it is food scraps is preferred in a domestic vermicompost operation:

  • if your decision to start worm farming is to recycle your food waste, then there is no reason to start making effort to bring manure into consideration, especially if you have only couple of worm farms running as you will have way more food scraps than worms to process it.
  • animal (and human) manure has the potential risk of containing toxic/pathogenic substances/organisms and this needs some period of hot composting in order to be used safely. Fresh manure will also heat up and in enough amount can kill the worms.
  • some weed can pass through the animal digestive system and still be viable in the manure. They can germinate in the garden when the manure is applied, even aftr the manure has been fed to the worms.
  • some manure can contain salt and urine (ammonia) that can be harmful to the worms, hence the manure needs to be pre-soaked and rinsed prior to the feeding.
  • as for human manure or dogs/cats manure, the rule of thumb is to avoid manure from animals that eat meat to their high risk of pathogen contamination. So unless you know what you are doing, should better avoid these.
  • not properly composted it can smell bad

I recommend you not to consider using animal manure until you have more worms than food scraps. Even then, you still can source extra food scraps from friends, neighbours or local fruits and veggie shops. If you have horses or poneys, why not just pile compost it and apply directly to the soil and save the worm farms for food scraps?

Now if you are still insisting on using manure then here some advice for different types of manure you can commonly get.

General advice

Always hot compost animal manure

In order to make remove pathogen and weed risks, it is highly recommended that you hot compost any animal manure before feeding the worms especially when the vermicompost will be used on edible plants.

For use as worm food, you need to pile up the manure in a 3' x 3' x 3' pile and let it heat up to at least 55C (131F) and less than 65C (149F). This range of temperature will kill pathogens and weeds but not the beneficial organisms.

Depending on the type of manure, you might need to add more carbon rich material to get a C:N ratio in the range of 25:1 to 30:1

Those organisms require moisture and oxygen to properly do their composting work. So moisture control and regular turning of the ile is required.

Once the temperature has reached 55C (131F) for three days or once it drops back to 43C (110F), turn it inside out and let it heatup back to 55-65C (131-149F) again to insure all the manure has been heat treated.

In a domestic worm farming operation, it is probably not worth the effort of using animal manure due to the work involved getting the itsafe to be fed to the worms can. Food scraps and carboard is all you need to keep the worms happy.

Beware of possible critters invasion

Worms are not the only ones who love manure, a pile of fresh (or not) manure will very likely attract other insects such as flies. So if you are composting indoors remember that you take the risk of bringing those buggers into your home.

Pauly "DrWorm" Piccirillo in his eBook "Worm Farming Revealed" share with us a trick he uses even for the generally safe goat manure. He soak his goat manure in a bucket of boiling water to kill germs and seeds then strains the manure before feeding his herd. Check out the book for more useful tips, I guarantee you will learn a lot from it.

Diversity means quality

Don't feed only manure if your aim is quality vermicompost as varying food source will ensure a wider range of available nutrients and micro-organisms in the vermicast.

Horse manure

This is probably the popular animal manure. However horses only digest around 40% of what they eat, which means there will be high chance of presence of viable seeds in the manure, these will happily sprout once deposited in your garden. Having an almost perfect C:N ratio they are great as food and bedding material; and hot composting horse manure does not usually require adding anything more to the pile.

Chicken manure

Chicken manure is highly rich in nitrogen and will very likely to heat up and kill your worms when added in sufficient amount. Best is to use it in your regular compost bin/pile or feed very little of a manure that has composted for an extended amount of time.

Cow manure

There is less chance of having seeds in cow manure due to their four stage digestive system. Hot composting is still recommended however some people have had success with just rinsing the manure.

Rabbit/goat/sheep/alpaca manure

Being cold manure, they can be used straight into the garden where they perform greatly. However when used as worm food you need to soak/rinse them to remove traces of urine and salts that are harmful to the worms.

More information

For those wanting to get more in-depth knowledge about composting animal manure for a larger operation here are some interesting online documents:

https://www.ag.ndsu.edu/manure/documents/nm1478.pdf

http://www1.agric.gov.ab.ca/$department/deptdocs.nsf/all/agdex8875

You can also join me in the Worm Farmin Alliance where some members are experts in the subject and will be helping you with any information you need.

There have been a lot of questions asked about whether or not one should freeze their food scraps in because they don't have enough worms yet.

My take on this is don't freeze for that particular reason. The only reason I would freeze food scraps is if I know my scraps contains fruit fly eggs and I want to kill them.

If your objective is waste reduction then you have already reduced it by doing worm farming , no need to freeze.

If you want to reduce even more or your final objective like me was to divert all your veggies and fruits scraps from landfills then wait until you have more worms, no need to freeze. Remember you are already doing something good and this is a journey, you are not yet at destination.

If your household is generating 8lbs (4kg) of food scraps per week you would need at least 3 worm bins (of the size of a Worm Cafe) at maximum worm population to process all the scraps. So with a single worm bin you will be freezing faster than you feed the worms and by the time you have enough worms to process the 8lbs of scraps you generate, you will still need more worms to also process all the scraps you have put in the freezer... so you decide to start a 4th bin or even a 5th one. Then what happens is you are able to empty the freezer and now you have too many worms and not enough food to feed them... oh and do you have enough space for 5 worm bins, now you might need to buy a new house... A bigger house with large back yard leads to making more children to play in that backyard, eating more food, generating more scraps, needing to be frozen again, leading to breeding more worms... lol sorry just a silly digression

For those who need more info let see the pros and cons of freezing food scraps.

Pros of freezing food scraps

  • you stock scraps for later use
  • kills fruits flies eggs to avoid infestation if it has happened in the past
  • breaks down cells structure and helps breaking the scraps down faster

Cons of freezing food scraps

  • you use some freezer space for the worms not for your family edible food
  • breaks down cells structure and release too much moisture too fast, that is a potential for turning the bin anaerobic.
  • the food is now softer due to cell structure being broken, the worms are now chewing it, not faster, not more, just earlier.
  • when you decide to throw the scraps anyway because you need to recover that freezer space, the food when thawed will rot faster and your wheelie bin will smell aweful in just couple of days

As for the last cons point, when you add fresh scraps to the bin, the worms won't touch them until it has been broken down by bacteria and become soft, that usually takes up to a week. By freezing, you break down the cell structure of the scraps, hence helping the bacteria and the worms will attack that soften food 7 days earlier. However:

  • they eat at the same speed
  • they eat the same quantity
  • compared to the total time you will have to wait until you harvest the finished vermicompost, 7 days is nothing. Note: it is only 7 days total delay. The first feeding will be delayed by 7 days, the second and subsequent feedings are also delayed but because the worms are busy with the older food this does not add up.

Another question that has been asked several times in forums and group is whether or not compost worms (Red Wigglers, Blue Indian worms...) can survive in the garden. A very popular answer found on the Internet is that compost worms cannot live in the soil and will die if added to your garden or garden beds. This is not true... or at least not totally...

Compost worms CAN survive in your garden, in your garden bed and even in your pots whether or not it has an open bottom. They CAN, but it does NOT mean that they WILL, that's the nuance.

Compost worms are epigeic worms, they live in the top inches of the soil in the protection of a layer of organic matter: humus, fallen leaves or fruits, mulch, wood chips etc... That layer of organic matter acts as dual purpose:

  1. protection from the elements: it creates shade and retain moisture
  2. food source: as the organic materials are being broken down by bacteria and other critters they will also become worm food

The belief that compost worms cannot survive or travel in the soil is also wrong. In nature, food is never available at all time in the same spot. As food become scarce, compost worms need to move to another area and they do so underground travelling under the surface, thru the top layer of soil. Make a pile of fresh horse manure on top of the soil and few weeks later you will see worms in the pile, where were they coming from? If your garden is well covered with plants that creates some level of shades and retain moisture, chances are that you have compost worms there: a free source of worms for your bins. If your soil is uncovered and dry, you just need to make it worm friendly.

Making your garden worm friendly

In order to increase the chance of survival of compost worms in your garden you need to provide them with:

  • a protection against the elements: this can be obtained by adding a thick layer of mulch, fall leaves, wood chips or compost. If your garden or garden bed is dense in plants that also create shades then you're probably fine.
  • a source of food. Luckily enough, the protection above will also, with time, become worm food. To kick start, you could use a worm feeding station such as an on-ground worm bin, for example a Big Rotter
  • make sure to keep everything moist: the layer of organic matter will help with this too but a regular double check might be required in hotter/drier climates.

Worm Farming Glossary


It's a material that provides a bed to an animal. Like us, worms likes to find a place comfortable and safe to spend the day when not at work(feeding). They don't let to live in a jungle of food or their own casting(poop). Actually the food layer can be dangerous and kill them: when too much food is added the extra that does not get eaten start to rot, heat up, become acidic and release a lot of water. Which is why when setting up a new worm farm you need to prepare the trays with a lot of bedding material so our little friends can take refuge into and rest or make babies! ☺️

The bedding is made of materials are moisture absorbent, allowing air flow, rich in carbon and in the case of materials that are fresh such as grass clippings or horse manure they need to have passed the heating up stage. As with regular composting, the ratio Carbon:Nitrogen needs to be high enough for the composting process to be efficient and odorless. The bedding alone can also regulate the pH level (acidity) by diluting the moisture coming from the food breaking down. And when in enough quantity it will also be much cooler than the food in decomposition.

Why is bedding important?

  • it makes a clean home for the worms
  • when fresh and dry bedding material is added with each feeding, it will absorb excess moisture from the food scraps and help avoid anaerobic situation and will reduce/stop the production of leachate (wrongly called worm tea) thus keeping all nutrients in the vermicompost
  • bulky bedding material such as corrugated cardboard enhance airflow
  • a layer covering the new food scraps will help reduce odours and keep criters away from the food source
  • in winter a thick layer of bedding material at the top will act as a blanket keeping the bedding warmer
  • starting a worm bin with at least 6 inches of bedding material will give your worm a safe place to retreat to if the food scraps heats up and ferment
  • at some point, the bedding material will breakdown and become food too

Good bedding materials can be:

  • well aged horse manure which composting worms love. It needs to be well aged to provide a safe environment to the worms
  • corrugated cardboard are excellent readily available material that can be shredded or hand teared
  • newspaper are also excellent material shredded or hand teared in one inch strips
  • egg cartons are easier to rip off than corrugated cardboard
  • aged grass clippings
  • decomposing old leaves (humus)
  • aged coffee ground
  • peat moss
  • coco coir
  • etc...

You will want to use a combination of different bedding material as each of them will have strength and weakness.

A thick layer of bedding is advised when starting a new farm, half to two thirds of a feeding tray works well. Then every time you feed the worms add fresh dry bedding in same quantity as the food then lay the food on top of it then cover the whole thing with more bedding to restrict access to the food from other critters. Depending on the type of food you are giving and the moisture level of the existing bedding you can add the fresh bedding dry or moist it with a spray.

These are worm bins which first obvious characteristic is the lack of bottom (or presence of false bottom made of pipes or a grid). CFT worm bins use the fact that compost worms prefer to live in the 10 to 12" of soil (in our case bedding) where the food usually resides; this allows the worms to migrate to the top of the bedding and leave the bottom with casting only; and because they take about a year to fill up, the cocoons will also have all hatched and juvenile worms would have migrated to the top too. As a result, the harvesting is free of worms and cocoons, no need to sift all you do is use a hand rake to scratch the bottom of the CFT or in the case of a false bottom using a grid there will be a cutting blade few inches above the grid that would cut a slice of casting that will fall through.

Another characteristic of a Continuous Flow Through is, thanks to the large top and bottom opening, the air flow is much the better allowing more oxygen to flow through the bin.

General pros of a CFT:

  • the extra oxygen allow support of a bigger population of worms, usually double the one of regular worm bins
  • better quality castings that are well oxygenated to support the life of aerobic bacterias
  • the casting is not too wet (muddy)
  • process larger amount of food in a faster time (once at cruising speed) thanks to the double population of worms (up to 4lb per sqft)
  • less maintenance during feeding and harvesting: no need to separate the worms and cocoons, easier to feed one CFT than feeding four Worm Factory.
  • bigger error margin: with an initial bedding of a depth between 12 and 18" the worms have a large neutral area to retreat to if the feeding layer is getting too hot or acidic (due to overfeeding or weather)
  • it's closer to how it works in nature and the casting can be harvested without disturbing the worms who can still feed actively at the top

General cons of a CFT:

  • the bedding and casting will dry quite fast and regular moisture control will be needed.
  • it's rather large and heavy so once you have installed it you won't change its location
  • process a larger amount of food, you will need more food scrapes. This is not usually an issue but more something to keep in mind)
  • you will also need a large amount of bedding material to create the initial bedding but also at each feeding
  • more expensive unless you go DIY with salvaged materials

The fast drying issue can be mitigated with:

  • regular spraying or flushing (flushing is not recommended because it can create a too wet bottom)
  • the use of some plastic sheets covering the bedding to keep the moisture
  • use of automatic sprinklers

This is an excerpt from the "Worm Farming Revolution" book by Pauly Piccirillo:

"All life needs minerals, but worms also need minerals to aid in digestion. They don’t have teeth to grind their food into smaller portions. They have a gizzard. Within the gizzard the bacteria get trapped between stones that the gizzard causes to rub against each other, like a pestle and mortar."

  • So as you can see it is a good idea to help your worm by adding grit to your food scraps to help the worms process it. This could be a small handful of:
  • powdered eggshells
  • garden lime (calcium carbonate)
  • rock dust such as Azomite or Zeolite
  • sand
  • soil

The three first items also double as pH buffer

One of the important things to monitor in a worm farm is the pH. We would want our bedding to be as neutral as possible usually between pH 6 and 7. An acidic bedding (below pH 6) might be sign of overfeeding and the food has started to ferment and this could create all sort of issues from bad smell, to an explosion of the population of tiny white worms (pot worms) and bugs (springtails, mites).

One does not need a pH meter to know when a bedding is acidic. Just look for those small white critters. If they suddenly go out of control this means the pH is low (high acidity) and moisture is high.

The solutions are:

  • feed less
  • give more time between feeding
  • add more fresh and dry bedding material (cardboard, newspaper) that will absorb the moisture and "dilute" the acidity
  • use some pH buffer

What is a pH buffer? It is a material that is neutral in a neutral environment but will start reacting with acidic environment to neutralise it. We use calcium carbonate (CaCO3) as pH buffer, the carbonate will react with hydrogen ions to form hydrogen carbonate or carbonic acid that will decompose into carbon dioxide and water. This reaction reduces the acidity.

Sources of calcium carbonate are:

How much pH buffer to use?

Do not worry about adding too much pH buffer unless you add really way way too much. Calcium carbonate is neutral in a neutral environment and only start acting when the bedding is getting acidic. So if your bedding is neutral, the CaCO3 will remain in the bedding, a little bit will become grit for the worms and the rest will stay there until the acidity level goes up (hence the word buffer). For those who want something to refer to, I'm personally adding about two or three handfuls of garden lime for about 2 kg (4.4 lbs) of food scraps.

How to apply the pH buffer?

  • when starting a worm bin, mix few handfuls of pH buffer to the initial bedding. For example with a Can-O-Worm, Worm Factory or Worm Cafe, if you have 10 cm (4 in) thick of bedding material, you can mix in 3 to 4 handfuls.
  • when feeding, sprinkle the pH buffer to the current bedding before adding the food scraps, additionally also you can mix more pH buffer to the food scraps.

​Protein poisoning can occur when you overfeed your worms. Worms usually secrete calcium carbonate with their calciferous glands, this allows them to neutralise (acidity) the food they consume. However when overfeeding them, especially with protein rich food such as dry worm food (grains), the food being consumed becomes highly acidic during decomposition and the calcium carbonate secreted is not enough to lower that acidity. As a result the food continue to ferment inside the worm's body, gas is formed and trapped in the worm's intestine, that is when you noticed deformed worms in what we call a "string of pearl" shape.

Stressed worms are more likely to contract protein poisoning, one of the reasons for stress is overhandling, this is why it is good to not disturb them too often: feed them once a week or no more than twice and leave them alone between feed.

How to avoid protein poisoning?

  • start a bin with between 6 and 10 inches of moist bedding
  • only feed the the worms what they can eat in a week
  • add fresh and dry bedding under the food each time you feed in same amount as the food, this will absorb moisture and help lower the acidity
  • add pH buffer such as powdered eggshells or garden lime (Calcium Carbonate)

What to do if my worms have protein poisoning?

  • you are not likely to be able to save the worms affected by protein poisoning
  • if it is a mild case of protein poisoning you can add a lot of bedding material (shredded/torn cardboard, newspaper, egg boxes...) to dry a wet bedding, add pH buffer, mix everything gently but thoroughly
  • in a severe case, empty your bin and spread the bin content on a flat surface (large piece of tarp for example) and pick out survivors not affected by the string of pearl and put them in a separate container. Add bedding material and pH buffer to the spread out bin content to neutralise it and put it back in the bin. Setup a new bin for the salvaged worms and leave the previous bin for a couple of months or more for surviving cocoons to hatch.

The words vermicast and vermicomposts (VC) are often used interchangeably, however they indicate different things.

The vermicast is the actual worm poo, but unless you go through the content with a microscope, it is impossible to be certain that all material in a worm bin has been through a worm digestive system, thus the term vermicompost is more appropriate.

Pure 100% vermicast is also impossible unless you separate the material using a microscope and leaving the material in the bin too long in the hope the worms will consume everything again and again will also affect their health.


Used Coffee Grounds are very popular with organic gardeners who use them as soil amendment or mulch.

One of the reason of this popularity is UCG being rich in nitrogen and it is available for free at your local cafe. Alternatively you can even contact a local roaster and ask to take their coffee chaff which is the dry skin (husk) that falls off during the roasting process, it is almost as rich in nitrogen as the UCG.

However, I recently read about a potential issue of using coffee grounds and chaff. The problem raised is the allelopathic properties of these products. Allelopathy refers to the beneficial or harmful effects of one plant on another plant. We are more worried about the harmful effects as it is reported that UCG when applied directly to the garden can block germination of seeds or stunt the growth of certain plants. Which is why it is preferable to add it to a regular compost bin/pile or feed it to the worms prior to application in the garden. There are few studies that confirm this by showing that some organisms in the soil are feeding on the allepathic compounds and hence remove their effects.

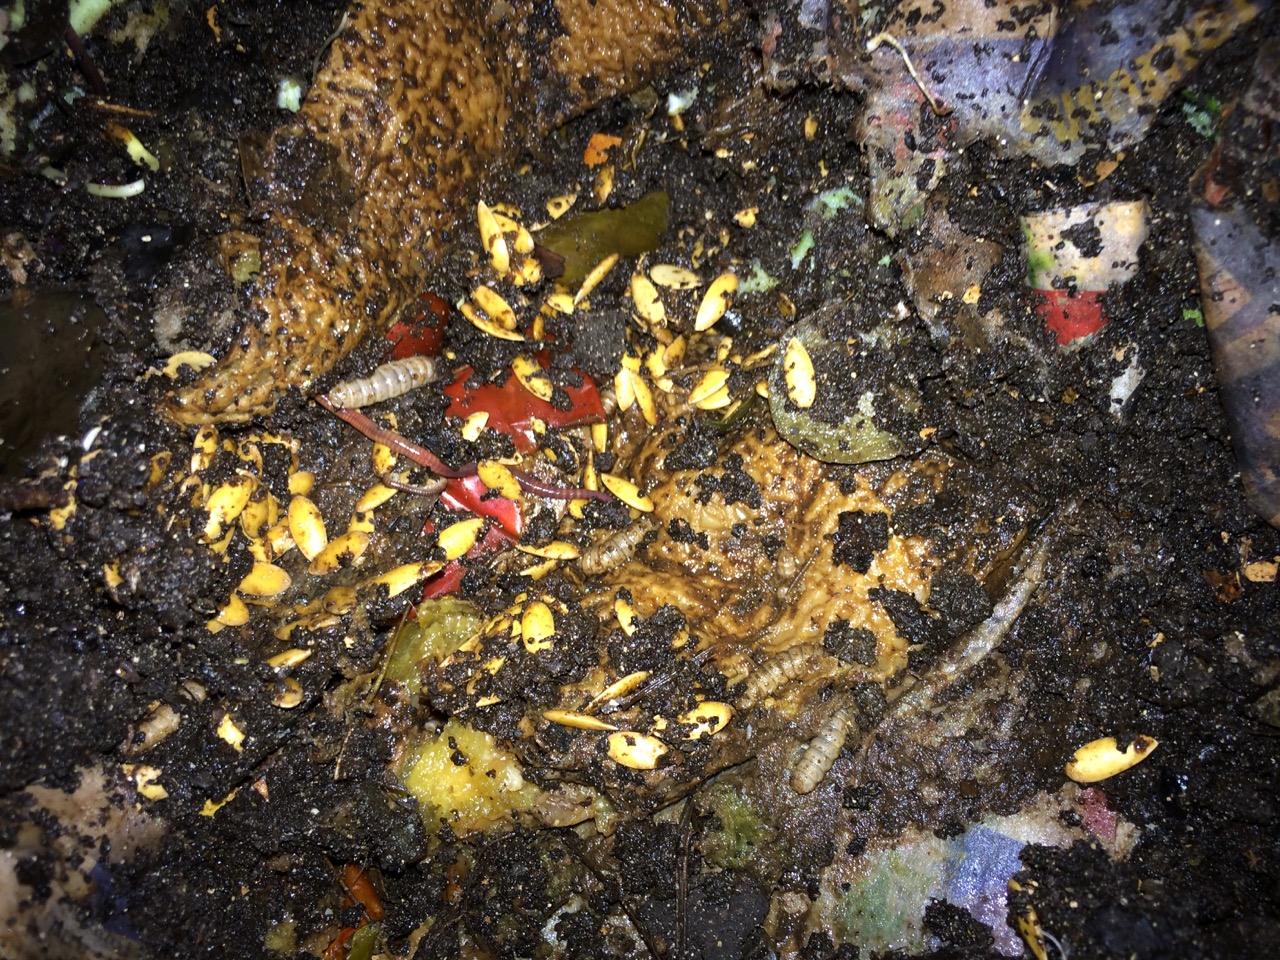
BSF stands for Black Soldier Fly and BSFL stands for Black Soldier Fly Larvae.

The Black Soldier Fly, Hermetia Illucens, is a large fly that looks like a wasp, how ever it does not sting and does not eat and thus as opposed to the common house fly it is not attracted to human and their food and won't be hovering around and bothering us. At no stage of their life are they considered pests nor are they vector of diseases.

The female BSF will look for fermenting food scraps and will be depositing a cluster of about 500 eggs on a dry adjacent surface instead of on the food itself like the common house fly. When they hatch, the larvae are so tiny you will probably not even notice them. Here is a video of a freshly hatch BSFL through a microscope at 40x magnification.

When conditions are ideal, it will take about 14 days from hatch time for the larvae to reach their pupal stage while consuming an enormous amount of food (up to 1 gram per larvae per day) which they convert an extremely high percentage to biomass (up to 90% converted) thus considerably reducing the volume of the scraps. They will then change from a cream color to a darker almost black color, at the same time they will loose the use of their mouth and will stop eating for the rest of their lives. The pupae will not like the environment where they have grown in and will try to escape to a drier environment. The garden soil is great for them, they will bury themselves and await about 14 days (in ideal conditions) to transform into a young fly that will crawl out to the surface.

The female BSF are attracted to fermenting rich food and a compost pile or a worm bin is a great source of food for their offsprings which is why it is quite common to encounter BSFL in a vermicomposting system in warmer parts of the planets. Quite often are we seeing people posting photos of the larvae asking if they are some kind of worms or maggots and if they are friends or foes. Well, like most of the time with worm farming the answer is it depends. Although the BSF larvae are not directly harmful to the worms (even though they would eat a dead or maybe a dying worms) their food consumption process generate a lot of heat which will create an imbalance in the worm bin and some worms will probably not appreciate this and might try to escape or die. However this should not be necessarily a reason to rush and try to exterminate these larvae, they are still a good allies if managed properly. Remember they eat a lot and pretty fast and for those who are trying to compost as much food scraps as they can, BSFL will be of great help.

How to get help from BSFL?

  1. Create a new separate composting bin just for the larvae and they will be able to process even food you usually avoid giving to the worms such as meat or dairy products
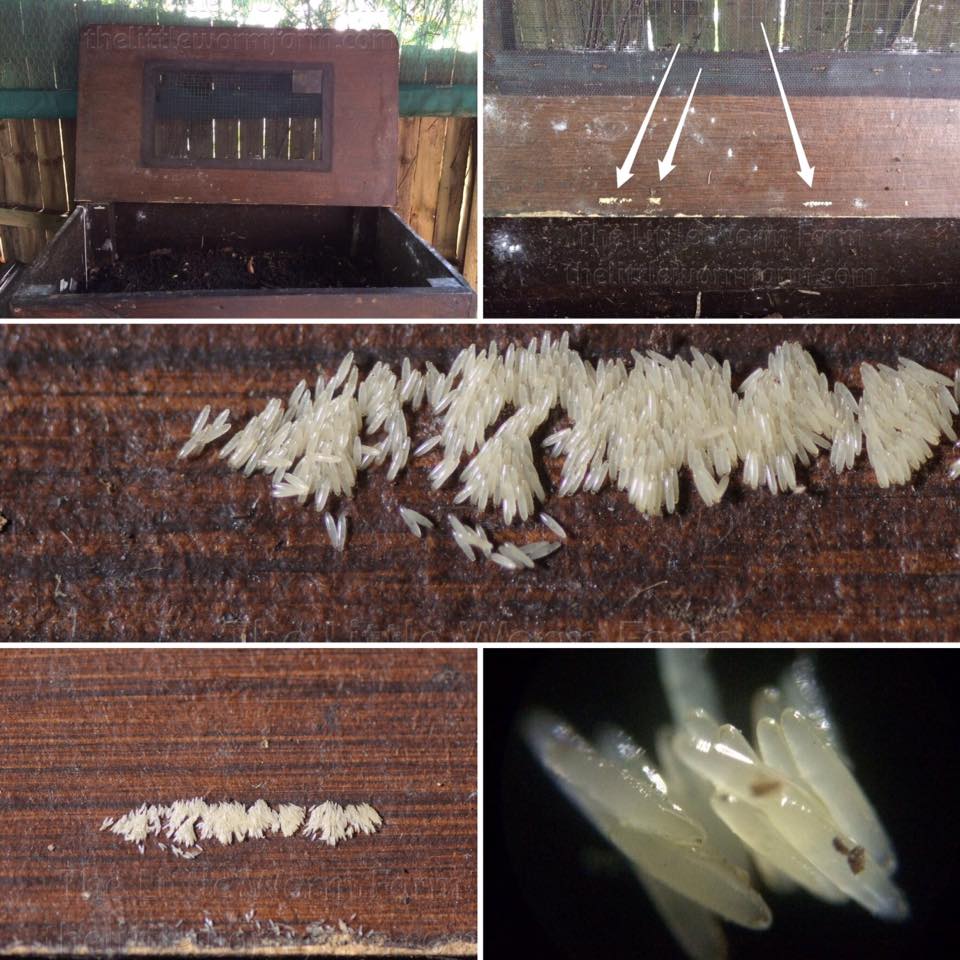
  2. Leave them with the worms but control their population by regularly monitoring them and manually remove them if necessary and regularly looking for egg clusters that can be deposited under the lid or the internal walls of the worm bin.

Here are some photos of BSF egg clusters:

BSF egg cluster

For more information, have a look at my blog about BSFL.

Maintaining a website, blog and helping people on forums and groups does require a lot of dedicated time. Thankfully I enjoy doing it but it is still a big part of my day. Some people, in order to financially support their free involvement are writing books or eBooks or if their main job is worm farming they will also sell worms and vermicompost via their website. However for other people like me worm farming is a secondary activity and we are not necessarily good writers to publish books. This is where affiliation programs come in.

So instead of selling my own products on my website, I have chosen to mainly rely on selling products other people make. But rather than buying a stock and reselling it, I have chosen to affiliate myself to those people sales system: I redirect you to their sales page and if you decide to buy the product, the sellers will take a percent off the sales and give it to me as a commission for bringing them customers.

How does it work?

When you click on one of the affiliate link on my website (or any other website), it redirects you to a temporary page on the seller's website that will add a cookie to your browser to indicate that you are coming from me. When then purchase a product that I'm affiliated to, the sales system will then see that cookie and will know that xx% of the sales should go to me. There is no surcharge applied to you, you still pay the regular product price, but to thank me, the sellers have accepted to give me part of his earning from the sales I bring them

Support me.

So by buying a product you are interested in via my website, you are actually supporting both the product seller and myself. But keep in mind that most affiliate systems are using what they call the last-click-wins model. This means the last affiliate link that has been clicked on will get the commission. For example, if today you click on the following: Worm Farming Revealed Ultimate Package but then decide for any reason to buy it later on the same day or another day. Later on you have forgot where to find the product again and instead of coming back to my website you have stumbled on the link to the same product but on another product or maybe a forum or Facebook group, the commission from your next purchase will go to the owner of that new link, not me.

So if you intended to support my work, please make sure you are always clicking from this website or my other posts on social networks. 

Thanks to all of you who are already doing this, it is very much appreciated.

Comments & Questions